6.30.2006

Finding New Zealand in New Jersey

A year into my place (I suppose I cant quite call it ‘new’ anymore) and I’m still discovering all the little nooks and crannies of the area. Being in the suburbs, everything is so close by that I feel it’s a shame I haven’t come to see it all by this point.
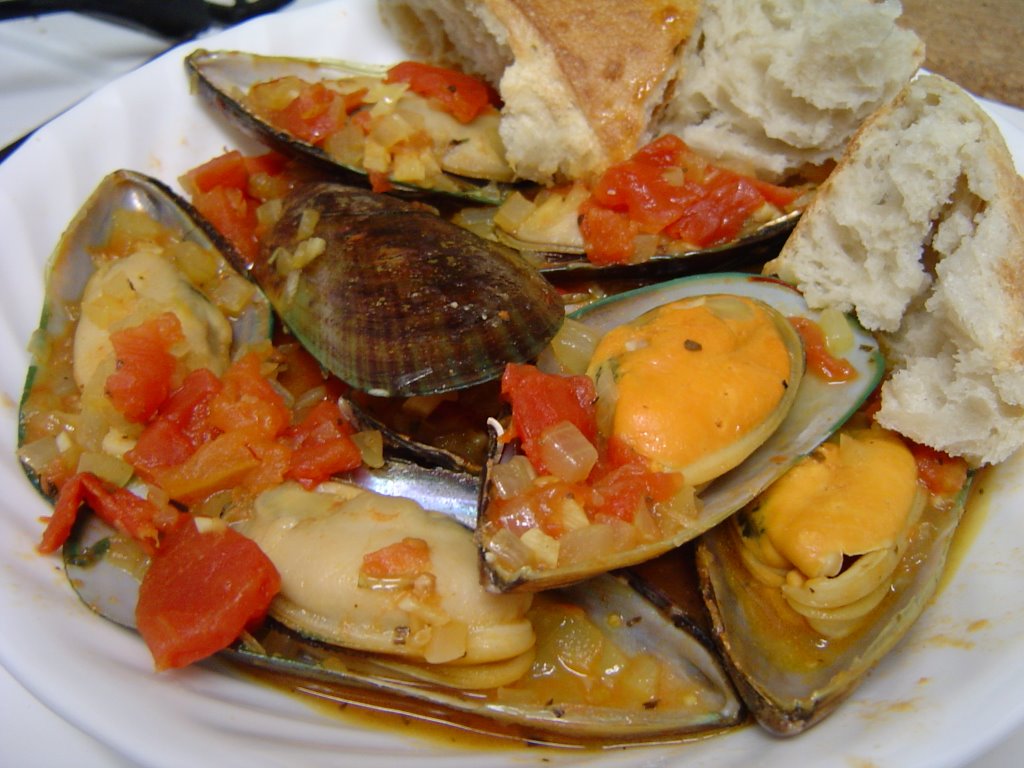
Such is the case with the clam bar we ended up at this past weekend. It’s unapologetic in its simple décor, if you can call dimly lit, unfinished floors, and a full view of a galley-like kitchen décor. The food’s not extremely varied, tending primarily to clams, crabs, shrimp and the obligatory fried flounder filet, but we did have a quite tasty bisque (bonus points for the large jars of crunchy oyster crackers on the table) and fried soft-shells. We also split an appetizer of New Zealand mussels – and this is the exciting part – the very small store in the front of the restaurant sells them frozen for a reasonable price. I am decidedly spoiled after growing up eight minutes from the Jersey shore, but I’m not averse to a good frozen seafood product if you can’t find a better fresh one.
I had planned on going back but perhaps not quite so soon. Nevertheless, when catching the late train back last night and knowing I had no more leftovers, I found myself turning the car into the parking lot. A few minutes later and I had myself a 2 lb box of mussels and some soft-shell crabs whose fate I haven’t decided yet. But the mussels. I headed back home, started a quick sauce with pantry staples, and threw a handful in to heat. Twenty minutes later, and I think I’ve found a new alternative to canned soup and salad for when the leftovers run out. If you use frozen mussels, as I did, I think it does lack of bit of fresh mussels' brininess, but this can be alleviated by a smidgen of salt. As the cookbook warns, the recipe won't make a lot of broth, though you could always increase the liquid, but you will want to soak up whatever's there with some good crusty bread.
MUSSELS IN SAFFRON-GARLIC BROTH
adapted from the Dean and DeLuca cookbook

1 Tbsp olive oil
1/2 medium onion, finely chopped
4-5 garlic cloves, coarsely chopped
large pinch of saffron threads
1/2 c white wine
1/2 c diced tomatoes and juices
6-8 mussels

Heat the olive oil in a saucepan over medium-low heat until hot. Add the onion, garlic, and crumble in the saffron, and cook for 5-7 minutes, stirring, until the onion is softened but not brown.
Add the wine and tomatoes in their juice and bring to a boil. Add the mussels and cover the pot tightly. Cook over high heat for 3-5 minutes until the mussels are heated through (if you are lucky enough to be using fresh mussels, cook 4-5 minutes or until the mussels have opened, discarding any that do not open. Either way, do not overcook).
Makes dinner for one with salad and bread.

6.28.2006

Nigella, Nutella and the Ice Cream That Isn't


I bought my ice cream maker back in high school, as an ambitious undertaking after being swayed by the pretty pictures of that year’s Williams-Sonoma catalog. I promised my family gorgeous frozen desserts all summer long - flavors you couldn’t find in the grocery store, real cream, no preservatives. And then that summer I got the mono that threatens your spleen. Getting out of bed became a huge accomplishment for the day, and if I even thought about eating, someone else was making it. Somewhere along the way, the ice cream maker was thrust into the back of my closet.
Last year I unearthed it while packing and I’m slowly making up for lost time. I like the flexibility in personalizing and the greater option of flavor choices; I don’t especially like having to plan ahead to pre-chill the bowl in the freezer (newer models may not require this forethought, mine’s been around for a few). So I’m often still seduced by pre-packaged pints at the grocery store, but lately I’ve come across enough delectable sounding recipes to tempt me to start churning.
This one in particular has been haunting me for about a week and it was high time I did something about it. I’m a sucker for hazelnut, especially combined with chocolate, and its coming from Nigella didn’t hurt either. Regretfully, I express a touch of doubt at the final product, in that it wasn't at all what I expected. It’s delicious, but it’s not the texture of ice cream – more of a frozen mousse or the interior of a truffle, rich, dense, and creamy, but none of ice cream's meltiness. I don’t know if it was me or Nigella, but I think the measurement of Nutella called for is somehow off. I measured the spread as best I could (at most I’m a tablespoon over, which shouldn't make such a difference), but I don’t have as much left over as I should. It’s also not as dark as I imagined, and I might try next time adding a pinch of salt to bring out the chocolate flavor. The base is a bit different from my usual one, with no milk and only egg yolks, and perhaps that accounts for some of the variance as well. I’d make it again as is, but I’d also make it again striving for more of an ice cream than this decided to be.

FROZEN GIANDUIA MOUSSE
adapted from Nigella Lawson's Baci Ice Cream, in Forever Summer
4 large egg yolks

6 Tbsp sugar
2 1/4 c heavy cream
4 oz dark bittersweet chocolate (70% or more)
2 Tbsp Droste cocoa powder
3/4 c plus 2-3 Tbsp Nutella
1 Tbsp hazelnut syrup
1/2 tsp vanilla

Whisk the yolks and sugar in a bowl until thick and creamy (the mixture will be pale yellow and will not feel gritty anymore). Bring the cream to a boil and add it to the yolks, pouring very slowly and whisking well as you do so.
Melt the chocolate in the microwave according to directions and let it cool slightly. Whisk the chocolate and then the cocoa powder into the yolks and cream. Pour the chocolate-custard mix into a pan and cook on a low to moderate heat, stirring constantly, until smooth and beginning to thicken just slightly (about five minutes). Pour into a bowl or wide pitcher to cool, stirring occasionally to prevent a skin on top.
When the mixture has cooled, whisk in the Nutella, then the hazelnut syrup and vanilla. Freeze in an ice cream maker according to your model's directions.
Yield: about 1 qt.

6.27.2006

Conquering Breading

Breading chicken has always seemed excessively fiddly to me, with all the need to have eggs or milk for breading (two "staples" which I regretfully never have on hand), and then the need to touch raw chicken, and then the egg, and then the breadcrumbs or whathaveyou. I imagine breaded fingertips and a drippy piece of chicken that overall doesn't seem worth the effort when you could just grill the darn thing, and use tongs.
So I'm rather glad this coconut chicken had me hooked and determined just on those two words, because otherwise I might not have been so daring. And as it turns out, it really isn't fiddly at all - though perhaps that's a product of the recipe making for two instead of a larger batch (though I'm sure you could easily increase the quantities accordingly for one). I did end up with the breaded fingers, though because the whole process goes so quickly it didn't bother me. I'm actually even contemplating substituting large prawns for the chicken, but that's an ambition for another day.

COCONUT CHICKEN
adapted from Gourmet, September 1990

1 large garlic clove, mashed to a paste with 1/4 tsp sea salt
1/8 tsp ground ginger
1 Tbsp Dijon-style mustard
2 boneless, skinless chicken breast halves
flour seasoned with salt and pepper for dredging
1 large egg
1 Tbsp water
1/2 - 3/4 c sweetened flaked coconut
1/2 - 3/4 c panko bread crumbs
2 Tbsp unsalted butter
1 Tbsp white wine

Preheat the oven to 375 F. In a small bowl whisk together the garlic paste, ginger and mustard. Spread the mixture evenly on both sides of the chicken breast halves.
Have ready the seasoned flour in a bowl. In a separate bowl whisk together the egg and water well. In a third bowl gently toss together the coconut and panko to mix.
Dredge the chicken in the flour, then dip in the egg wash, letting excess drip off, and coat thoroughly in the coconut mixture, pressing to adhere.
Melt the butter in an ovenproof skillet over medium high heat, letting the foam subside. Saute the chicken for about 2 minutes each side (while you don't want the coconut mixture to burn or blacken too much, letting it go beyond golden brown is more flavorful than stopping at golden) until toasted looking. Add the white wine to the pan and transfer the skillet to the heated oven. Bake the chicken for 10 to 12 minutes, perhaps turning over once, until just cooked through.

THAI CUCUMBER SALAD
adapted from Bon Appetit, August 2001

zest of 1 lime
1/4 c fresh lime juice
scant Tbsp Thai fish sauce
1 Tbsp sugar
1 seeded and minced
jalapeño

1 English cucumber, seeded and sliced into thick matchsticks
1/2 thinly sliced Vidalia onion
2 tsp chopped cilantro

Whisk the lime zest and juice, fish sauce, sugar and
jalapeño in abowl. Toss in the cucumber and onion and stir in the cilantro. Let sit for about 30 minutes. Stir well again and pour off some of the excess liquid.

6.21.2006

Baking to Chase the Blues

When you're happy and you know it, clap your hands.
When you've had a not-so-hot day, you need to relax, and/or you simply cannot face another morning of Special K dry and crunchy from the bowl, bake.
It might not make it as a children's song, but in my opinion it's a darn good mantra. There is nothing like baking to make you feel better. It utilizes all your senses (I suppose there's not a lot of sounds in particular for baking, though certainly just hearing my gas oven light up works for me) for something that for me is almost in a sense spiritual, in which you can simply focus on the food and less on everything else. Nigella notes in Forever Summer (my current bedtime reading) that "the strange thing about cooking is that obviously it is about an end product, and yet it isn't entirely." And she is so right.
I actually came across the madmommychronicles post cruising the foodworld the other night rather randomly somehow, and thought how lucky she was to have found cappuccino chips. I adore the expanding chip sections, with everything now from swirled mixture to dark chocolate chips to little caramel cups. I personally have fond memories of cinnamon chips, which are fantastically good for muffins and the like, and despite an array of well-stocked grocery stores in the relative area I have not seen them since lewisburg. but I'd never seen cappuccino chips until the other night in the baking section, and then, in a moment of Mt. Everest mentality, I had to buy them and use them, simply because they were there. I had been contemplating scones in the first place for them, as I've got some leftover cream, but hadn't really been certain of what exactly. So I revisited the site and post which had clued me into the chips' existence. Though there's several good recommendations, there's a post of a Nigella recipe for cappuccino walnut cookies, and from there their inspired fate was sealed.
These are just my standard scone recipe from the new Joy of Cooking, with some cinnamon and vanilla thrown in - I really don't think there's much of anything that can't benefit from a touch of vanilla, so I've taken to just dashing it along with virtually any baked good. If I'd had espresso powder on hand, I think a touch could go in as well for a more pronounced coffee flavor, but the cinnamon makes the scone reminiscent of a snickerdoodle, and that's not a bad thing at all. It's really difficult not to cheer up with these treats: they're ready to go in just about a half-hour, are in the oven just long enough to finish all the dishes, and smell like happiness. Having already tasted part of one tonight (it broke coming loose from the sheet . . . I swear) there is no contest between scone and cereal as to what will start tomorrow's day off right.

CAPPUCCINO WALNUT SCONES
1/2 c chopped walnuts
2 c flour
1/3 c sugar
1 T baking powder
1/2 tsp salt
3/4 tsp cinnamon
5 Tbsp cold unsalted butter, cut into pieces
1 c cappuccino chips
1 large egg
3/4 c heavy cream + 1 Tbsp for brushing scones
1 tsp vanilla
turbinado sugar for sprinkling

In a small frying pan or skillet over low heat, toast the walnuts briefly until they just color and begin to give off aroma, about 5 minutes, tossing gently as you go. Remove from heat and let cool for a few minutes.
Preheat oven to 425 F.
In a large bowl whisk together the flour, sugar, baking powder, salt and cinnamon until well combined. Cut in the butter with a pastry blender until the mixture is a fine breadcrumb texture. Using a rubber spoonula or spatula gently stir in the cappuccino chips and cooled walnuts. In a measuring cup or small bowl whisk together well the egg, 3/4 c cream and vanilla. Pour the cream mixture over dry ingredients all at once and mix until just moistened, making sure to press and adhere any loose bits on the side of the bowl.
Transfer to a lightly floured surface and pat out to an 8-inch round. Cut into eight wedges and place about 1/2 inch apart on a ungreased baking sheet. Brush the tops with some of the 1 T cream and sprinkle with turbinado sugar. Bake until the tops are golden brown, 12 to 15 minutes. Let cool for a few minutes on the baking sheet before gently removing them to a rack. They're best served still warm from the oven, but still delicious when cool.
Yield: 8 scones

6.20.2006

Instant Gratification Crab Fondue

breakfast of champions: leftover crab fondue on crackers.

Ok. So it's not really instant, but it's rather quick from ingredients to table, and it is extremely gratifying. It's from the food network via Laura Rebecca, and it is just as good as she says and more. I'm not sure it's actually fondue, but I don't really care either. It has crabmeat, and that's all that matters.
I've actually made it twice since discovering the recipe - and many more times to come, I'm sure. The first was a single/halved recipe with fresh snow crab claws with the meat picked out, which is time-consuming and messy but oh-so-tasty and with a shaker jar of grated three-cheese blend including asiago. The second time was the full recipe with a container of refrigerated claw meat and shredded asiago fresco, which is a softer and mildly tangy version of asiago that I've found at TJ's and grown to love. Both came out well. For superb results, the fresh meat and asiago fresco would be a combination to die for, but it's not necessary to go that overboard. I can't honestly say how well leftovers keep, in part because there was so little left from either batch. It is probably best straight from the oven, but I confess to eating some cold from the fridge and microwaving some and dumping it on Triscuits, and it was still excellent. The grated cheese is good in a pinch and will certainly work just fine, but the fondue will lack a really creamy, melty smooth richness to it. If you have it on hand, or if you don't have a good cheese place around you I'd say shake it up, but personally I don't think I'd skip the real asiago again. For a double recipe, I might also sweat the onion and garlic for just a minute or two prior to mixing in so it's a bit softer, but if you're using less garlic and a sweet onion, you can probably just make it as is.

CRAB FONDUE FOR TWO
from the food network

8 oz crabmeat, drained if canned
3/4 c mayonnaise
1 medium onion, chopped
several garlic cloves, minced (how many you use is up to you. I personally used about 4 for this recipe, and don't think it's too much, but you may wish to cut it down in half or even to one.)
1 c grated asiago fresco or asiago
paprika
French baguette or two demi-baguettes

Preheat the oven to 350 F.
(If so inclined, sweat the onion and garlic together briefly until just beginning to soften, making sure the garlic does not brown or burn.) In a large bowl mix crabmeat, mayonnaise, onion, garlic, asiago and paprika together. Put mixture into an ovenproof baking dish. Cover and bake until the mixture is heated and bubbly, about twenty minutes. Uncover and bake until golden brown for an additional five to ten minutes.
Heat the baguette in the oven until warm. Slice or tear the baguette into pieces and serve with the hot crab fondue.

Today I Ate A Cricket

I want to put a picture here, but I feel it's a rather rude surprise and not really sure I want to look at it anyway. Check hotlix.com if you're curious.
I talk a fairly good game in the food world. But for all I think I'm adventurous, I am far more squeamish than I'd like to admit. And despite anthropology courses, reading Marvin Harris's Good to Eat, growing up with Fear Factor having an unnecessary but ubiquitous presence on television, and having blind-tasted a variety of things in research, I was having serious qualms about even ordering these supplies for the lab. I'm not an insect girl, even when they're outdoors, and I don't like the looks of them any better when they're in tiny packages covered with seasoning.
So. They arrived today, to my horror and the boss's joy, which was probably derived primarily from the skepticisim evident on my face. I don't think we keep them on hand for any other reason than shock value and the novelty. We opened a package of the bacon and cheese crick-ettes, and because I really am that much of a wuss, we downed one each at the same time like it was a grade-school dare. I did manage to keep my eyes open, but it was a slight stretch. They look exactly like dead crickets.
It's crunchy, and it tastes a little like artificial bacon and cheese. She told me that chitin, the same sort of texture of a shrimp shell, is the crunchiness, the exoskeleton. They're not bad, in the sense that they are edible, and probably the flavor might even be pleasant on, say, a rice cake or popcorn. Rationally, cognitively, that they are nutritious and an accepted food source in other cultures - it makes sense, but it was still damn hard for me to get past it. I think I'm glad I ate one, but I'm also glad I don't have to eat another.

6.19.2006

Lunchbox: Sesame-Roasted Vegetable Soba


Cookbooks combine two of my favorite things: reading and eating. I go through a good cookbook as easily as a best-seller. Out of the ones I have, Nigella Lawson's How to be a Domestic Goddess is one of my favorites, in part for the title alone, and in part because I feel no one deserves that title more than she, being beautiful and accomplished and with children and her own line of cookware, and in part because she makes me feel as though even though I do not have that British accent or shining hair, I can command my kitchen and make magic in meals. I am that sold on her.
So when perusing through the local library, I took out a copy of Feast and it has entertained me since, just idly flicking by the pictures and reading the accompanying blurbs like a personal letter. Her cold sesame soba noodles caught my eye and though this is not the recipe she gives, hers certainly gave me the inspiration and a starting point. I've been trying to eat more vegetables, and certainly I think others would work here - bok choy for instance, and some crunchy fresh julienned red pepper - but I've become a particular fan of asparagus since the lab work and discovering how to roast it properly. (Oddly enough, for the first time today, I ate a stalk raw, and found out that that's also delicious.) Roasted asparagus, in contrast to steamed or boiled, is far more flavorful and seems to pair well with a greater variety of main dishes. The sesame-roasted asparagus is one take that's been lingering in my mind for a bit, and I'm quite happy with how it turned out. I do want to caution you to go gently with the sesame oil, however; you don't want overwhelm either the vegetables or the noodles with an overly slick dressing. I used the 1/2 cup originally called for in the dressing and found it good but just too oily and not allowing the other flavors' accents; so I'm reducing the amount in the recipe listed here. Should you find it still a bit much for your taste, simply refrigerate or let sit until the oil rises to the top, and skim some off with a teaspoon.

SESAME-ROASTED VEGETABLE SOBA
dressing (adapted from Epicurious)
2 T plus 2 t light/lowsodium soy sauce
2 T rice wine vinegar
about a 1x2 inch piece ginger, peeled and very finely grated
4-5 cloves garlic, crushed
2 T honey
about 6-7 T toasted sesame oil
soba salad
about 7 oz soba noodles
about 10 oz baby carrots
12 oz asparagus, fresh or frozen, cut into about 1 inch sections
sesame oil and sea salt
5-7 large Thai basil leaves, thinly sliced
1 bunch scallions, chopped
sesame seeds

In a measuring cup or small bowl combine the dressing ingredients and whisk well. Allow to stand at room temperature for 30 minutes to let the flavors develop; whisk well again each time before using.
Boil the soba noodles according to the package directions, about 4-5 minutes to your taste. Drain well. Run the noodles under cold water to rinse; drain well again. Turn the noodles out into a large bowl and toss with about 1/4 c dressing so that they do not stick together.
Meanwhile, preheat an oven to 400 F. Wash and peel the baby carrots if they didn't come prepared, and slice them in half lengthwise. Toss the carrot spears with a tiny bit of oil, some salt, and half of the Thai basil leaves. Let roast in the oven for about 20 minutes, turning after 10. Toss the asparagus tips and spears with a tiny bit of oil, some salt, and the remaining Thai basil. Add to the carrots and roast another ten to twelve minutes, until the carrots are fork tender and the asparagus is cooked through. Let cool.
Toss the soba noodles with the asparagus and carrots. Drizzle the dressing over to taste and toss well to combine. Sprinkle a portion of the scallions and sesame seeds over each serving.
Should make enough for one week's worth of lunches.
Time: about one hour.

6.12.2006

A contemplation on vegetation: eggplant

a pile of pancetta and garlic makes anything good.
Eggplant is a troubling vegetable, as far as vegetables go. You can’t eat it raw. It often gets too mushy for me when baked, but it tastes good battered and fried. If you sauté it, it will soak up as much oil as you allow within its vicinity. Eggplant, it often seems to me, is simply begging to be voided of its nutritional value, and sadly often I am only too happy to oblige. Luckily enough, there is grilling.
Grilled eggplant is something quasi-artsy, as though it should appear only in a marked-up café entrée pyramid with roasted pepper and coulis, and it certainly is wonderful with there, and with other cold marinated vegetables in salad or sandwiches. But I also prefer it more humbly in place of the battered and fried version, where its meatiness stands out noticeably in the absence of breading. I also like it in those dishes because the eggplant fools me into thinking it's lighter, and therefore somehow allows me to justify smothering it with cheese. Eggplant rolls are a beautiful opportunity to do just that. A grilled eggplant roll is a gorgeous backdrop, a canvas of itself - the neutral insides contrast with the purple skin and the char marks of the grill, and cheese flecked with herb and pepper spills out the sides. Vary the seasonings, the accompaniments, and the eggplant roll coiled around will make it seem elegant.
I had been in the mood for eggplant and pasta though, and so this is a more familiar, Italian-style use of eggplant. The tomato sauce to accompany it is sort of an inspired improvisation – there’s an amatriciana sauce in the Dean & DeLuca cookbook I want to try, but this wasn’t the time. Alternatively if you're pressed for time, you can simply grill the eggplant and slice it into strips and toss it with hot rotini pasta and the sauce and dollop in the cheese.


GRILLED EGGPLANT ROLLS WITH SHORT-CUT AMATRICIANA SAUCE
sauce
one 26-oz jar good quality tomato sauce (I like Barilla)
1/3 lb. pancetta, diced
several garlic cloves, minced
small amount oil or butter
eggplant rolls

about 2-2.5 lbs eggplant
15 0z. ricotta cheese
grated asiago cheese
grated parmesan or romano cheese
salt and pepper to taste
1/4-1/2 tsp each dried basil, parsley, oregano

Start the eggplant: rinse and dry well and chop off the caps so you have flat ends. Using a knife, pare off the skin in about a 2-inch length on opposite sides of the eggplant. Slice the eggplant lengthwise so that each piece is bordered on the edge with purple, in about 1/8-inch or so thickness. Spray each slice with nonstick cook spray or dab very lightly with oil. Place on a preheated indoor grill or grill pan and cook on each side about six-eight minutes. Make sure the eggplant slices are cooked through before removing to a large platter to cool.
Meanwhile, melt the butter or heat the oil over medium heat in a 3-qt saucepan. Let the garlic soften but make sure it does not brown. Add the diced pancetta and stir. Let cook about five or seven minutes. Add the tomato sauce and stir. Bring to a slight simmer and let it meld.
In a medium bowl combine the cheeses and seasonings; stir well. Spray a baking pan with nonstick cook spray or prepare a broiler pan. Lay out a somewhat cooled eggplant slice and place a heaping tablespoon or so of filling at one short end of the slice. Roll the eggplant up and place in the prepared pan; repeat until you have run out of eggplant. Stir any remaining cheese mixture into the tomato sauce. Bake or broil the eggplant for three or four minutes until the cheese is just melted. Serve with tomato sauce and rotini pasta.

Lunchbox: Basil Green Bean Salad

My cilantro plant has actually grown two leaves, which has inspired me. I made a trip to the farmer’s market to buy a larger pot in which to replant the tomatillo vines, which have not had the decency to grow anything, and this good-intentioned move will either encourage them to get on with it or it will kill them off. I purchased another pot with the thought of starting basil from seed as well, but changed my mind when I came across a leafy sweet basil plant. It, along with a not quite as hardy looking Thai basil plant which I’ve coveted for some time, now occupies a place of honor on my windowsill.
Let me say right now: I may never go back to dried herbs again, and I am in severe danger of running out of windowsill. It took great measures of self-control not to purchase a towering sage and a tiny-leaved lemon thyme plant as well . . . but there’s always next week. I have high hopes for the basils, mainly because I hear they’re rather impervious plants and therefore good for the gardening inept like myself.
For now, I intend to make the most of them while they cooperate with me. The Thai basil is going into chicken broth for making jasmine rice tonight, and the sweet basil is being chiffonaded and sprinkled over green bean salad. Basil pairs well with many things, but favorites among them are vegetables, chicken, and more basil in the form of pesto. (I did have some pesto leftover from Trader Joe’s so I haven’t made any fresh, but should the plant continue to flourish, I certainly will be letting you know.) The shredded leaves fresh in a salad make their presence known just a bit more assertively above the pesto, providing singing bursts of flavor when you spear them against a tender-crisp green bean or a ripe tomato. If you can, keep the tomatoes out of the refrigerator, or at least let them come to room temperature.

BASIL GREEN BEAN SALAD
2 14-oz. packages haricot verts, prepared according to package directions
1/2 Vidalia onion, soaked and rinsed as for Beans and Tuna Salad
about one lb boneless skinless chicken breasts
few tablespoons pesto
ricotta salata
red wine or your favorite vinegar
ten or so sweet basil leaves

While you're steaming the green beans and soaking the onion, smear each side of the chicken breasts with some pesto sauce and let it sit while you heat a non-stick pan over medium-high heat. Let the chicken cook, turning and moving occasionally, until slightly brown on one side. Turn the chicken over and continue to cook until lightly brown on the other side as well. Cover the pan and let the chicken cook through. Remove to a plate until cool enough to touch.
Let the green beans and onion drain while the chicken cools, combine in a large bowl. Toss with vinegar and some shredded basil leaves. Dice the chicken and crumble the ricotta salata; add to the bowl and gently toss. Adjust the vinegar factor. Garnish with additional shredded basil over the top.
Yield: approximately 5 lunchtime servings
Time: 30-45 minutes.

6.05.2006

Confessions and Casserole: Retro Recipe Challenge

Despite being a relatively modern, quasi-liberated young woman, I harbor a not-so-secret sometimes desire to be a 1950s housewife. I want to spend my days cooking, cleaning, and running around after little rugrats, and I want to do it all while wearing pearls and high heels and a red checked apron. And that is why when I discovered Laura Rebecca's Retro Recipe Challenge, and with it the chance to at least live out the cooking part, I was immediately hooked.
With the exception of diner food, nothing screams 1950s to me more than casserole. And this casserole, in particular, seemed like a straight-from-a-sitcom dinner table classic. It photographs like mystery meat, it contains condensed soup, and made by the original recipe a serving accounts for 46% RDA fat, 25% RDA cholesterol, and 44% RDA sodium. Now that is a casserole.
Having read that I found I could not actually bring myself to make it original recipe. It's not that I'm any form of real health-conscious, it's just that ignorance is bliss, and I couldn't knowingly ingest that as written. So I cut out the sauce entirely and I used 98% fat-free cream of chicken soup as a half-hearted attempt. In addition, the only veal around was selling for $14.99/lb. That didn't quite jive with my notion of 50s frugality, plus if I'm going to shell that out for veal, I'm not smothering it in cream of chicken soup. So I went with chuck stew meat, a much cheaper option, reasoning that beef is kind of like grown-up veals anyway. I still had some of that darn buttermilk so that replaced some of the milk in the dumplings. And finally, my container of silver onions was 12 oz. instead of a pound. I made up the difference with some French-fried onions mixed in, which added back some of the fat and just seemed casserole-appropriate.
I'm still not actually sure how I feel about the casserole. It's decidedly edible and overwhelmingly mediocre, despite the surprisingly postive rating given it on the Pillsbury website, and I was rather hoping it'd live up to that reputation or be so spectacularly awful as to be humorous. Instead,
it has some sort of casserole identity crisis; it's not quite beef and dumplings and not quite beef potpie. But it wants to be so much more, and all you taste is the potential. The beef dredged in flour and paprika smells lovely to start. Make the gravy; throw in some mushrooms and thin onion slices, and you've got yourself a nice mock Stroganoff if you make some egg noodles on the side. Toss in some chopped carrots and celery, onion and peas, and you've got a quick stew. Let it simmer long enough with some good canned tomatoes and herbs, and you have a beef ragu.
I bet it would taste better if I'd made it wearing a red checked apron.

(EAST-COAST) CALIFORNIA CASSEROLE
adapted from the original 1956 Pillsbury Bake-Off winning recipe

casserole
1/3 c flour
1 tsp paprika
2 lb boneless chuck, rump, or other suitable cheap stew beef in 1 to 2-inch pieces
1/4 c oil
1/2 tsp salt
1/8 tsp pepper
1 c water
1 can 98% fat-free condensed cream of chicken soup
1 1/2 c water
1 12-oz container silver (pearl) onions, drained
1 2.8 oz can French-fried onions
dumplings
2 c flour
4 tsp baking powder
1 tsp baking soda
1 tsp onion powder
1 tsp celery seed
1 tsp Bell's poultry seasoning
1/4 tsp salt
1/4 c oil
1/3 c buttermilk
~ 1/3 c milk
2 Tbsp margarine, melted
1/2 c breadcrumbs

In a large plastic bag mix flour and paprika; add well-trimmed beef pieces and shake to coat. Heat 1/4 c oil in 12-inch skillet over medium heat. Add beef and cook until browned. Add 1/2 tsp salt, pepper, and 1 c water. Bring to a boil. Reduce heat; simmer uncovered 30 minutes, stirring occasionally. Transfer mixture to ungreased 13x9 baking dish.
In same skillet, combine soup and 1 1/2 c water. Blend well and bring to a boil, stirring constantly. Pour over beef mixture. Add onions and French-fried onions and mix well.
Heat oven to 425 F. In large bowl combine flour, baking powder and soda, onion powder, celery seed, seasoning, and salt, mix well. Add the oil and buttermilk and enough milk so that when stirred dry ingredients are just moistened.
In small bowl combine melted margarine and breadcrumbs. Drop spoonfuls of dumpling dough into crumb mixture and roll to coat well. Arrange dumplings over warm beef mixture. Bake at 425 F for 20-25 minutes or until dumplings are deep golden brown.

6.02.2006

Lunchbox: Looks Can Be Deceiving

[photo removed because apparently, it really looks that bad.]
And I swear, it's a lot tastier than it looks. We'll blame the fact that I used balsamic vinegar for the poor photo, and not my lack of artistic skills . . . although I send my apologies to the balsamic and to you.
After three nights and two days of soup, I'd had it with liquids and was craving something more solid that didn't necessitate eating with a spoon. Alas, my motivation was slipping and it seemed that despite having a relatively full freezer and refrigerator, none of it actually was food.
Enter the pantry reserves. I've never had too much of a fondness for canned tuna, believing it really only finds its place in recreations of my mother's tuna casserole, and I've gotten to be such a sushi snob that I don't actually even like it fresh tuna cooked. But I digress. There were the cans of tuna, dutifully on the shelf as one of those staples that seems like a good idea to have but then just sits there to stare back at me at moments such as this. I vaguely recalled that there must be something one could make that would disguise the utter fishiness of it and after several mad dashes through the cookbook shelf, I found what I was looking for.
The resulting dish is pleasantly surprising and fulfills all of my end-of-the-week, no-food-no-energy-no-time dilemmas in creating a healthy lunch for the next workday criteria. It has benefits in that it's likely ingredients sitting in your cupboard, and if not you can fake it - I used only half the amount of beans for the same amount of tuna and onion, and balsamic for red wine vinegar because that's what I had - and while you might lose some aesthetics I doubt it'll mar the taste any. I added tomato as an afterthought for texture and to feel virtuous about eating vegetables, but it really needs nothing else - the beauty of this salad lies in its simplicity. Though if you can, I'd recommend allowing the extra time for the onion to soak - it's a rather effortless step that mellows the onion.

BEANS AND TUNA SALAD
adapted from Marcella Hazan's Essentials of Classic Italian Cooking

1/2 medium onion, preferably a sweet one like Vidalia, or red would be tasty too I bet
1 15-oz can cannellini beans, drained and rinsed
salt
1 can tuna
extra virgin olive oil
good balsamic or red wine vinegar
black pepper

Peel the onion and slice it in very thin rings, put it in a bowl and cover amply with cold water. Squeeze the rings in your hand for 2 or 3 seconds, closing your hand tightly and letting go, for seven or eight times. The water may turn slightly milky from the onion's acid. Retrieve the onion rings with a colander scoop or strainer, pour the water out of the bowl, put fresh cold water in. Put the onion back inot the bowl and repeat the squeezing/draining process 2 or 3 more times. After squeezing the onion for the last time, change the water again and put the onion in to soak. Drain and replace with a fresh change of water every 10 minutes; repeat this three times. Drain the onion, gather it tightly in a towel and squeeze out all the moisture you can.
Put the beans and onion in a medium bowl and sprinkle liberally with salt and toss gently. Drain the tuna and add it to the bowl, breaking it into large chunks with a fork. Pour on enough oil to coat well, add 'a dash' of vinegar (I'm a vinegar fan, and threw in much more. Go gently at first, and add until it's to your liking.) and a generous quantity of cracked black pepper. Toss thoroughly, turning over the ingredients several times; taste and correct for seasoning.
Yield: 2 good-size lunch servings
Time: About 30 minutes for the onion, plus another five for assembly.


6.01.2006

Baking weekend: cinnamon buns

Rob has informed me that the way to his heart is not through his stomach.
Despite this nugget of important information, which tactfully suggests that six dozen cookies as a Valentine's gift might have been slightly overkill, this past weekend he did confess that he's had a craving for the cinnamon buns I made ages ago. Wits and beauty are all good things, but call me traditional - I believe in the power of baking. And it must have worked on some level, as we spent a lazy Monday in the kitchen cooking together.

These rolls are a powerhouse recipe, a deceptively easy effort for the reward of a properly doughy biscuit with a heady cinnamon aroma and lick-your-fingers-good sugary filling. They're acceptable enough for breakfast yet decadent enough for dessert. I've had the recipe for some years now, and never had someone not like them.
Truly, love at first bite.

QUICK CINNAMON BUNS WITH BUTTERMILK ICING
from an old Cook's Illustrated magazine

flling
3/4 c packed brown sugar
1/4 c granulated sugar
2 tsp cinnamon (use the best you can find. it's worth it.)
1/8 tsp cloves
1/8 tsp salt

1-2 Tbsp unsalted butter, melted
biscuit
2 1/2 c flour plus additional for work area
2 Tbsp granulated sugar
1 1/4 tsp baking powder
1/2 tsp baking soda
1/2 tsp salt
1 1/4 c buttermilk, at room temperature
6 Tbsp unsalted butter, melted
1 tsp vanilla (optional)
icing
2 Tbsp cream cheese, softened
2 Tbsp buttermilk
1 c powdered sugar

Preheat oven to 425 F. Pour 1 Tbsp melted butter in 9-inch nonstick cake pan; brush to coat pan (I recommend using a silicone pan for easier cleanup, but any nonstick will work).
To make filling: combine sugars, spices and salt in medium bowl. Add 1 Tbsp melted butter to start and stir with fork or fingers until mixture resemebles wet sand, adding the additional butter if necessary.
To make biscuit dough: Whisk flour, sugar, baking powder, baking soda and salt in large bowl. Whisk buttermilk and 2 Tbsp melted butter in measuring cup; whisk in vanilla if using. Add liquid to dry ingredients and stir with wooden spoon until liquid is absorbed and the dough starts coming together in a shaggy ball. Transfer dough to lightly floured work surface and knead until just smooth and no longer shaggy.
Pat and roll dough into 12x9 -inch rectangle. Brush dough with 2 Tbsp melted butter. Sprinkle evenly with filling, leaving 1/2 inch border of plain dough around edges. Press filling firmly into dough. Starting on long side, roll dough, pressing lightly, to form a tight log. Pinch seam to seal. Roll log seam-side down and cut evenly into eight pieces. With hand, slightly flatten each piece of dough to seal open edges and keep filling in place. Place one roll in center of prepared pan , then place remaining seven rolls around perimeter of pan. Brush with remaining 2 Tbsp melted butter.
Bake until edges are golden brown, 23-25 minutes. Use offset spatula to loosen buns from pan without separating. Place a large plate carefully over top of pan and using potholders invert pan onto plate. Using a second large plate and potholders, carefully invert rolls again to be face-up. Cool about 5 minutes before icing.
While buns are cooling, whisk together cream cheese and buttermilk in large nonreactive bowl until thick and smooth. Sift powdered sugar over; whisk until smooth glaze forms. Smear over buns with an icing spatula or for a traditional bakery look, drizzle glaze over buns using a large slotted spoon. Serve immediately.


Yield: 8 buns.