11.15.2006

Dishes of Comfort: Tuna Noodle Casserole

Ivonne of Cream Puffs in Venice and Orchidea of Viaggi e Sapori joint-hosted the Dishes of Comfort event to blog about meaningful culinary comfort. Comfort food can be a little difficult to define. There's no shortage of things I'll turn to when I'm feeling that need (they don't call it emotional eating for nothing), including probably most prominently these days sushi and chocolate.
But my childhood comfort food absolutely has to be tuna noodle casserole. It's one of those dishes I think that you're innately not supposed to like, especially as a child. But I've always loved it, and in particular my mother's version. I can't really say why, and it's not linked to any one particular memory food-wise or other. It's certainly nothing gourmet, nothing requiring great culinary demand, and given that I won't ordinarily eat tuna out of a can kind of strange. But I could - and certainly have been known to - eat it for breakfast, lunch and/or dinner. On breaks when I'd come home from college, I'd always request it, and often my parents were nice enough to make a separate pan for me to take back.
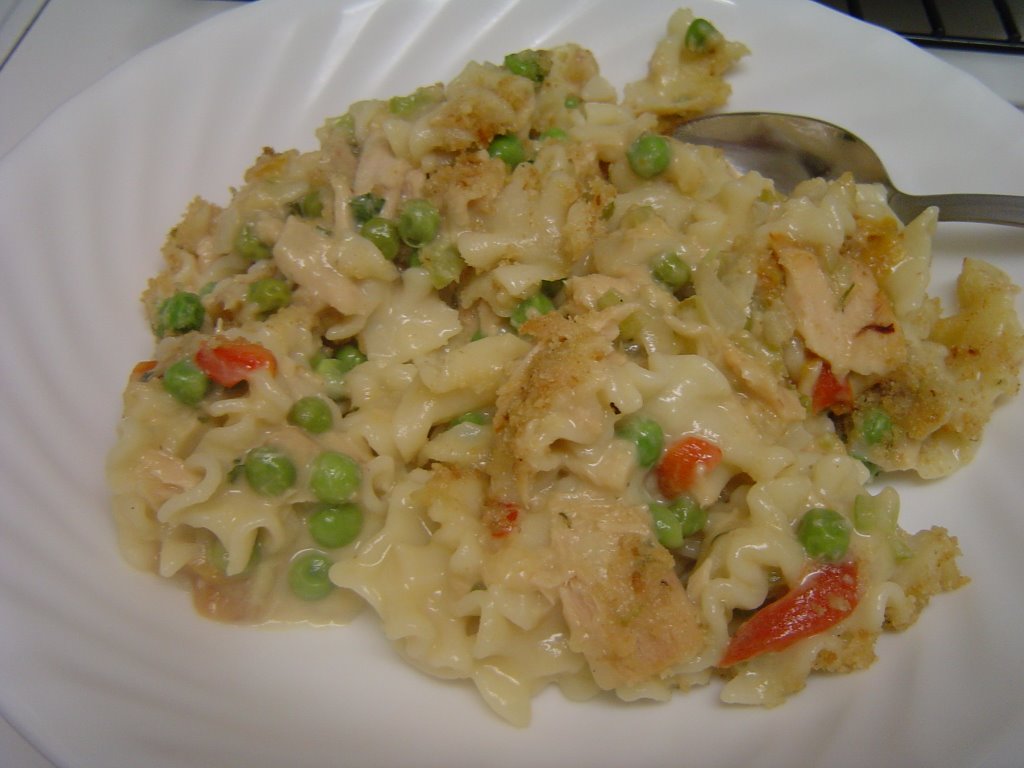
Their version was creamy with cheese, a bit crunchy from the vegetables, and slippery noodles were stuck all in between.
I have my mother's recipe stuck in between pages of a cookbook somewhere, but I learned the basic proportions ages ago - my job used to be opening the cans of tuna, and then I graduated to chopping, then stirring, and somewhere along the line I could make it on my own. It's as good as I remember, and as always, even better with lots of Old Bay or salsa on top.

TUNA NOODLE CASSEROLE

1 12-oz box mafalda noodles or lasagna bits
1 large onion, finely diced
4-5 ribs celery, finely diced
2 cups frozen peas
1 7-oz jar roasted peppers, drained and chopped
2 cans condensed cream of celery soup
16 oz low-fat sharp Cheddar (such as Cabot Light)
1/3 c chopped fresh parsley
worcestershire sauce to taste
white pepper to taste
4 cans water-packed tuna
4 Tbsp butter
2/3 c dry breadcrumbs

Preheat the oven to 350. Spray a deep 9-10x13 pan with nonstick cook spray.
In a large pot of boiling salted water, boil the noodles according to package directions until al dente, about 8-9 minutes. Drain well and toss into the prepared pan.
Meanwhile, place the onion and celery in a skillet with a bit of oil. Saute until beginning to soften. Add the frozen peas and cook for about four minutes. Add the vegetables to the pasta. Add the chopped peppers to the pasta.
In a separate pot, melt together the soup and cheese. Stir in the parsley, worcestershire sauce and white pepper. Add the drained tuna, flaking it apart with a fork, and stir well to combine. Pour the cheese sauce over the noodles and vegetables, and mix well. Smooth the surface.
In the skillet used for the vegetables, melt the butter. Stir in the breadcrumbs until the crumbs are well buttered to ensure they do not burn. Carefully spread the breadcrumbs over the surface of the casserole.
Bake, uncovered, for about 30 minutes.

Tag: dishes of comfort

11.14.2006

Practice Makes Pies: Part III, We Have A Winner

It's getting down to the wire for Thanksgiving - how did November disappear so quickly?
Given the lack of success with last week's pie, I was determined to make one more effort and hopefully evade goopiness. Let's recap:
The crust thing was also really starting to get to me. I pre-baked, I partial-baked, and this time I thought, less effort - we'll see what happens and I didn't bake the darn thing at all. I tried out one more recipe, a basic butter flaky pastry crust from the Essentials of Baking. It came together rather well, had an even appearance, and rolled out dutifully enough. I shielded it from the beginning of baking. The crust didn't shrink, and it didn't overbrown. Certainly, it seems, not baking is the way to go for pecan pies.

The recipe itself became sort of a Hail Mary last effort. I couldn't decide on a particular recipe, so I took the parts that sounded best and just assembled them all together. Thankfully, this is not too difficult an effort with pecan pie, which seems to remain largely the same in terms of ingredients and differs only with respect to proportions. The one tip I'd really like to pass on was from the first effort with Paula Deen, who mixes the melted butter with the sugar before adding other ingredients. Not only does this make the sugar easier to mix with everything else, it also ensures that the butter does not unmelt and harden into little clumps if for instance the eggs are not fully at room temperature. Without the butter seizing like that, the mixture is easier to stir and the butter is more evenly distributed in the filling. I'm a fan.

I used light brown sugar and corn syrup because I very much liked the caramel buttery taste of the last unfortunate pie, but also because they were what I had on hand. Contrary to what I would've thought here, it doesn't result in a much lighter filling - which is a good thing, it looks like what I imagine pie should look like. There's no cross-sectional pictures so you'll have to take my word, but the filling held on its own, slicing beautifully. Joe, my taste-tester this time around, noted that it seemed if anything just slightly overbaked, but this is easily remedied and I'll take it out just a bit sooner. ladies and gentlemen, I'm convinced of this one.

PERFECT PECAN PIE

unbaked 9-inch pie crust
2 1/2 cups pecan halves
4 Tbsp butter
1 c packed light brown sugar
1/2 c light corn syrup
3 large eggs, room temperature or close to it
1/2 tsp vanilla salt or regular salt
1 tsp vanilla extract
1 Tbsp bourbon

Toast the pecans in a skillet over medium heat until they are fragrant, about five to seven minutes, turning every so often so that they do not brown or burn. Remove from heat and let cool.
Preheat the oven to 350.
Measure the sugar into a large bowl. Melt the butter and add to the sugar; stir until the butter has been absorbed. Add and mix in the corn syrup, eggs, salt, vanilla, and bourbon until the mixture is smooth. Add the toasted pecans and gently stir to coat.
Pour the mixture into an unbaked 9-inch pie crust. Place a pie shield or place strips of foil over the edges of the pie to prevent over-browning. Bake the pie in the 350 oven until the filling has set (if you're good enough, you can go by whether the middle jiggles or not; I erred last week and so this time tested the filling by inserting a knife in the center), about 45-50 minutes. Remove the pie pan to a rack to cool. Allow to sit at least an hour before slicing and serving.

Five-Spice Char Siu

At any given dinnertime I feel like there are at least eight million things I could do with a pork tenderloin. Absolutely marvelous stuff.
I had been going back and forth between two recipes, but settled on this one, in part because I was really craving the soba noodles to go with it. It's one of those things that ends up being more Asian-inspired than Asian itself, but this doesn't bother me - it came remarkably close to the strips of pork hanging in the butcher area at my favorite Asian grocery store, and that's good enough for me.
Be sure to put enough water in the bottom of the pan so the drippings don't burn.

FIVE-SPICE CHAR SIU
adapted from Simple Chinese Recipes

2 tsp five-spice powder
2 Tbsp sugar
2 Tbsp oyster sauce
2 Tbsp hoisin sauce
2 Tbsp reduced-sodium soy sauce
1 tsp chili sauce
2 tsp sesame oil
2 Tbsp light rum
2 Tbsp black bean garlic sauce

2 pork tenderloins, each about 1 lb

3/4 c or more boiling water

Mix the marinade ingredients together. Place the pork tenderloins in a large Ziploc bag and pour in the marinade. Squish it all around to coat and seal, pressing out the air. Refrigerate and let marinade for at least 2 hours.
Preheat the oven to 425 F.
Place the tenderloins in a rack on a baking pan, reserving the marinade. Place the pan on a rack in the oven and pour the boiling water into the bottom of the pan. Roast at 425 for about 15 minutes.
Brush the pork on all sides with the marinade and turn the pork over. Reduce oven temperature to 350 F. Let roast for another 15 minutes.
Turn the oven off and let the pork sit in the hot oven for another 10 minutes. Remove, slice, and serve.

11.08.2006

Lunchbox: Chickpea-Kidney Salad with Parsley, Lemon and Dried Tomatoes

Psych GREs: Done.

The weekly effort against sandwiches was sustained.
Salads have been a tricky thing as of late, and I have to confess I haven’t been reaching for the lettuce lately what with all the don’t eat this, don’t eat that FDA restrictions. So I set my sights on looking for distinctly different, non-lettuce salads.

I like this because it looks like a summer’s burst of color on days that have been all too dreary with the rain and the early darkness (daylight savings is sometimes just really depressing). What’s also good is with all the canned and jarred ingredients, I’m still getting vegetables at a time when the peppers and tomatoes have not been at their brightest in the produce section.
To sum up: all the things a good lunchbox should be – quick, healthful, easy, and good for the whole week. To cut back a bit, I used the bagged dried tomatoes instead of oil-packed ones and cut the oil for the dressing in half. I also spiked mine a bit with more seasoning as I think it needs the spice to wake it – and me – up, but that said it’s missing just a touch of something, more cumin, maybe some lemon zest, to give it the real zip I’m looking for. Even so, it’ll join the lunchtime rotations.

CHICKPEA-KIDNEY SALAD WITH PARSLEY, LEMON AND DRIED TOMATOES
adapted from Bon Appétit, July 2002

1 15.5 oz can chickpeas
1 15.5 oz can kidney beans
1/2 c chopped fresh flat-leaf parsley
1/3 c thinly sliced dried tomatoes
1 12-oz jar roasted red pepper, thinly sliced
1 bunch/6 scallions, thinly sliced
1/4 c lemon juice
2 Tbsp olive oil
2 garlic cloves
~ 1/2 tsp dried hot red pepper
1 tsp ground cumin
cucumber

Rinse and drain the chickpeas and kidney beans well and place in a large mixing bowl. Add in the chopped parsley, tomatoes, roasted red pepper and scallions and mix gently to combine. Pour over the lemon juice and olive oil. Press the garlic cloves directly into the bowl Sprinkle over the hot red pepper and ground cumin. Season to taste with salt and pepper. Mix gently to combine well and refrigerate.
For each lunch serving: I use about ½ of a medium to large cucumber daily with the bean salad, but don’t like adding it in directly because it will go all watery. The night before or the morning of, peel, seed, and dice ½ cucumber and add in to your portion of salad.

11.07.2006

Practice Makes Pies: Part II, Thomas Keller

The second trial of pecan pie-making was set last week. Originally, I’d planned on going with the filling recipe from Joy, and at the last minute perusing the internets last week I found a pie recipe from Thomas Keller. With more pecans, more eggs, and more sugar, it just seemed so lusciously over-the-top that I scrapped the plans for Joy and moved on.
Like the previous pie, I encountered some difficulties.
Let’s start with the crust: this time around, I decided I wanted to make a cream-cheese crust. It sounds rich, tangy, and was touted as remaining tender no matter what you did. Sounds good to me. The crust itself was easy enough to mix, or so I thought – when I shaped it into a disk, I kept noticing mottled patches in the dough – but I’d cut it in to the required texture. The dough also seemed noticeably ornery to roll out the following day; it didn’t tear, but it didn’t seem to want to move anywhere either. The crowning insult came when I tried to pre-bake it again. I thought I’d be smart, clever, and merely pre-bake the crust for several minutes so it wouldn’t burn like the last time. After five minutes in the oven, I removed the pan and took a peek. The entire crust, so prettily edged around the pan, had completely slipped down the sides and looked greasy. I almost stopped right there.

Inadvertently, it ended up making a pretty pie – with no upper crust edging, the filling rose even with the top of the crust and looked very full. This was an illusion. Once cut, the pie gushed filling and drooped. The outside held, but towards the center the pie was goopy. I thought it had a rather nice caramelly flavor to it, but overall it didn’t do it for me, and it didn’t quite pass with Rob or Joe either.

Good points on this pie include the high rise of the filling, the mild flavor, and that the pecans on top can be meticulously arranged (not shown) to be pretty if you’re so inclined because they’re not mixed in with the filling. Detractions include the filling that’s more sauce than set (it improved after being cut and let sit for a day past that) and the fact that because the pecans are not mixed with the filling, they don’t have a crunchy sugary coating on them. A good choice if you're not finicky about really pretty slices, but it won't be coming to Erie.

THOMAS KELLER'S PECAN PIE
adapted from Thomas Keller via NYMag

crust for a 9-inch pie
2 1/2 c pecan halves
4 eggs
1/4 c granulated sugar
1/4 c light brown sugar
1/2 c light corn syrup
1 c brown sugar corn syrup
2 Tbsp butter
1 tsp vanilla
1/4 tsp salt

Preheat the oven to 350 degrees. Coarsely chop half the pecans and set aside. Combine the eggs and sugar in a bowl, then add the corn syrups, butter, bourbon, vanilla, and salt, and mix together until smooth. Add the chopped pecans. Pour the mixture into a 9-inch pie crust. Arrange the remaining pecan halves over the top and bake in the oven until the crust is golden and the filling is firm to the touch, about 40 minutes (I had to let mine go about five minutes more, but it may not have been enough. Cover the top with the foil if the pecans are browning too much). Allow to cool for about an hour before cutting.

11.02.2006

Retro Recipe: Susan's Macaroni, Tomato, and Cheese

When the Fall Favorites Retro Recipe Challenge came along, I was tempted by the roast chicken picture, and toyed with the idea of potpies, but really I was in the mood for baked, casserole-y, and cheesy goodness. Don’t get me wrong – I think cheesy goodness goes down admirably any time of year – but as the leaves change, winds blow ferociously, and it gets darker every evening, hearty comfort food sounds particularly comforting.

I recently had the excellent good fortune to find at our local library annual sale a near-pristine, full three volume set of The Illustrated Good Housekeeping Encyclopedic Cookbook (a total steal at three dollars!) from 1965. I thought it would be excellent for retro challenges and the sheer amusement factor. It has not disappointed me, with some truly atrocious pictures, or rather good pictures of atrocious things, and entertaining recipe categories such as The Stag Party and recipes like Banana-Ham Casserole, Cheese Sauce.
The macaroni and cheese hails from its pages, and the only snafu encountered was with the cheese itself. I had difficulty finding the ‘process Cheddar’ it required, which apparently is different from process cheese food or process cheese product. The book also notes that Cheddar is "sometimes called American or American Cheddar" - to me, there is a world of difference between Cheddar and American cheeses, but perhaps I am wrong.

There were only pre-packaged singles of American, which I could have melted, but it seemed kind of like a pain. The Velveeta, which I figured would be next best, only came in a huge 2lb block. I finally settled on reduced-fat cheddar, one because it was the right size and five bucks cheaper (retro thriftiness did me in) and two because although I am sure process Cheddar is not reduced anything, low-fat cheese was more likely to give a plasticy texture. However, 8 oz. of the cheese gave me about three loose cups shredded; one more than I should have had according to the recipe. I lived dangerously and used it all.
I was a bit surprised when I tasted it – I didn’t think the sauce would be thick enough, or that it would reach all of the noodles – but it’s good. I went back for seconds. Normally, baked tomatoes I think are kind of weird, but they reminded me of how good a grilled cheese with tomato is, and their addition in the middle definitely brings in more flavor. The sauce is just on the thin side (possibly because of the milk; I used the 2% in the fridge rather than buy whole; possibly due to the cheese) and needs a touch more pepper, but it really worked here to make a creamy coating. The whole baked thing looks messily homey and tastes just as comforting.

SUSAN'S MACARONI, TOMATO, AND CHEESE
adapted from The Illustrated Good Housekeeping Encyclopedic Cookbook, 1965, Vol.2

2 c elbow macaroni
1 1/2 Tbsp butter
3/4 c dry breadcrumbs
4 tsp minced onion
2 Tbsp butter
1 Tbsp flour
1/4 tsp dry mustard
3/4 tsp salt
dash white pepper
2 c 2% milk
3 c grated reduced-fat Cheddar cheese (8 oz)
2 medium tomatoes, cut in 1/2-inch slices

Start heating oven to 400 F. Cook macaroni as package directs; drain.
Meanwhile, in double boiler melt the 1 1/2 Tbsp butter; toss with the breadcrumbs and set aside on a plate or waxed paper. In the same double boiler combine the onion, the 2 Tbsp butter, flour, mustard, salt and pepper; stir in milk; cook, stirring often, until smooth. Add 2 cups of the cheese; stir until melted.
In 1 1/2 qt casserole (mine just made it, but i did have the slightest spill-over of the sauce during baking - either use a slightly larger, or place dish on a baking sheet to catch any drips), place half of macaroni, all but 2 or 3 tomato slices, then rest of macaroni. Pour on cheese sauce; sprinkle with rest of cheese and buttered crumbs; arrange rest of tomato slices on top. Bake for 20 minutes.

tag: RRC4