7.27.2006

I Cuss, You Cuss, We All Cuss . . .

for asparagus!
That quotation's from an old far side cartoon, about marketing ploys that for some reason didn't become popular. (it makes me laugh every time.) And despite all the work the lab's done with asparagus, it's still a popular vegetable with me.
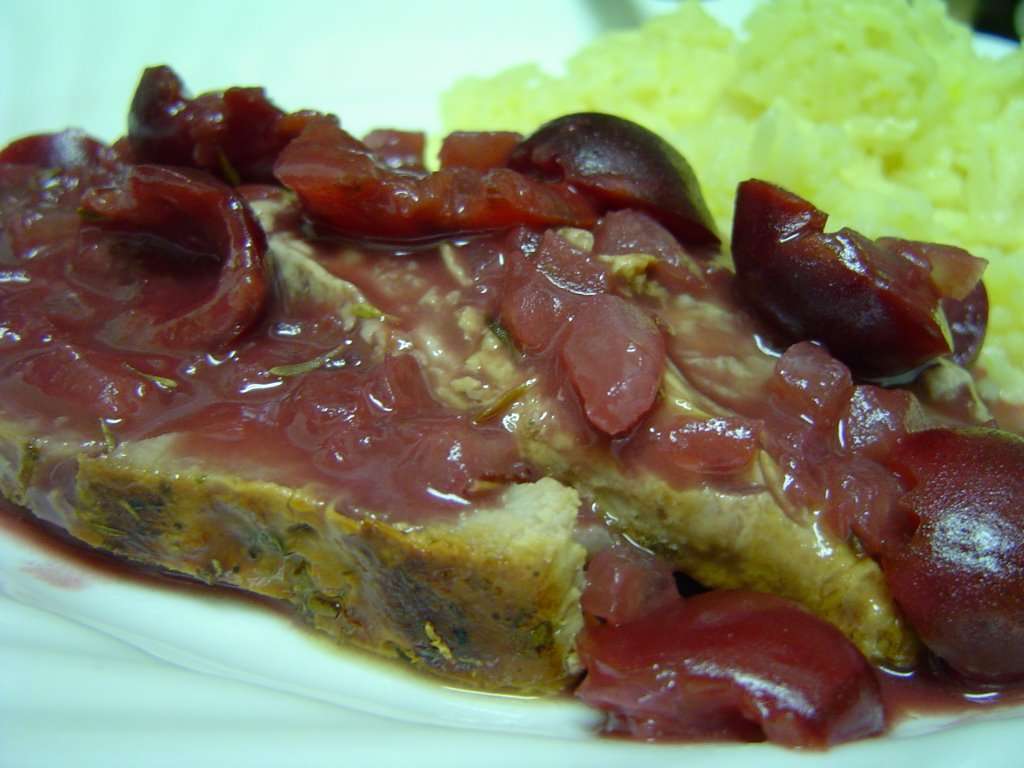
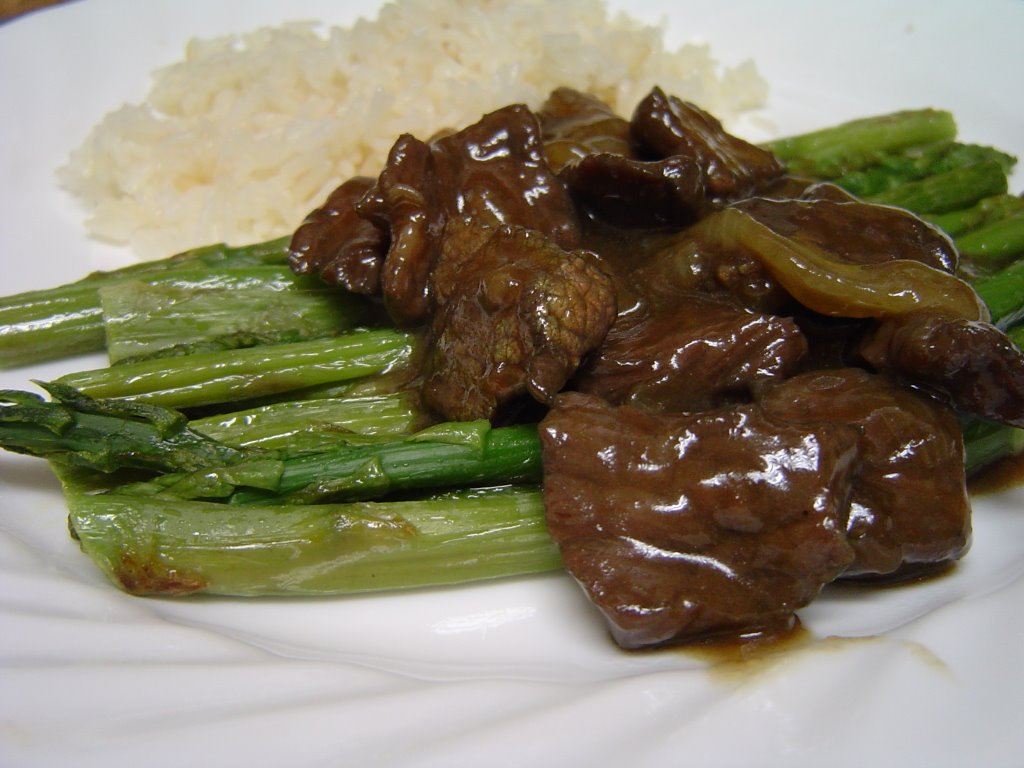
I prefer roasting the asparagus rather than stir-frying it, and it eliminates the step of chopping it. I'm pretty happy with the marinade overall - it certainly did the job of tenderizing some long-ago-frozen cubes of beef. I'm not too keen on the color though (was it the red wine instead of rice wine? powdered ginger? bad karma?); it ended up some sort of weird grey when I mixed it all together. Dump it all in anyways - the final sauce, while not the tempered brown of Chinese takeout or the shiny dark brown of the oyster sauce itself, comes out fine. You should also not taste the marinade to correct for seasoning once you've put in the baking soda, because it will taste awful . . . not that I did that or anything.

ASPARAGUS BEEF WITH OYSTER SAUCE
adapted from Simple Chinese Recipes

for the marinade
1 lb top round beef cubes
1 tsp baking soda
2 tsp sugar
~ 1/4 tsp each powdered ginger and garlic powder
4 tsp sesame oil
3 Tbsp light soy sauce
5 Tbsp red wine
2 tsp cornstarch mixed with 1 Tbsp cold water
for the asparagus
12 oz. fresh or frozen asparagus spears
a tsp or so sesame oil
for the sauce
1-2 Tbsp sesame oil
1 smallish onion, sliced
2-3 Tbsp oyster sauce
2-3 Tbsp chicken broth
1 tsp cornstarch mixed with 1 1/2 tsp cold water

Cut the beef cubes in thin slices. In a shallow dish, whisk together all marinade ingredients well to combine. Add the beef slices and toss to coat. Cover and refrigerate for a minimum of two hours, three if you can swing it.
Later: Heat 1 Tbsp sesame oil in a nonstick skillet. Add the onion and let cook, stirring occasionally and making sure it doesn't brown too much, about seven to ten minutes.
Meanwhile, preheat the oven to 400 F. While the oven is preheating, toss the asparagus with the sesame oil and place on a baking tray. Place the tray in the heated oven and let roast for ten minutes.
Back to the skillet: Add the additional Tbsp sesame oil if it's low. Drain the beef slices and add to the skillet. Stir-fry beef for a minute or two. Add the oyster sauce and chicken broth, stir well, and bring to a boil. Let cook for about two minutes. Mix the cornstarch and the water together well and pour into the sauce. Stir well. Let boil until the sauce thickens but is not too viscous or clumpy, about one minute.
Serve the beef and sauce over the asparagus spears.

7.25.2006

Lunchbox: Greek Salad with Chicken

Among my most recent addictions (this blog, bad workout dvds, season one of House) we can also add salads with basil in them. I am pretty much convinced at this point that there isn't much in the way of vegetables that basil won't improve upon, and fresh basil in particular.
Plus, it makes me feel like I've done something far more worthy of blogging it than simply pulling salad greens out, and it photographs quite nicely. Bonus points. The lemon and olive oil flavors come through really well on the chicken, which I suppose along with the salty tang of feta earns it the Greek association, though I make no claims as to any authentic origins.

GREEK SALAD WITH CHICKEN
adapted from the all-new Joy of Cooking
marinade
6-7 Tbsp olive oil
2 Tbsp lemon juice
dried dill and oregano
salt and black pepper
5 chicken tenderloins
for each salad
two large handfuls mixed salad greens
1 of the chicken tenderloins
2 radishes, sliced thinly
10 half-moon slices peeled cucumber
1/4 small Vidalia onion, thinly sliced
6-8 grape or cherry tomatoes
1/4 roasted red or yellow pepper
4 small basil leaves
feta cheese
1 avocado
bottled Greek dressing or a separate marinade recipe

In a shallow bowl, whisk together the lemon juice, olive oil, dill, oregano, salt, and pepper. The marinade recipe can also be used as your dressing - just make a second, separate batch and refrigerate until ready to use - whisk well before using. Add the chicken tenderloins and turn to coat. Marinade in the refrigerator for about three hours or so. Remove chicken from marinade and pan-fry in a nonstick skillet over medium heat until the chicken begins to brown on both sides and is cooked through. Remove and let cool.
Add the salad greens to a container and mix in with the radish, cucumber, onion and tomatoes. Dice the chicken and roasted pepper or slice in thin strips and add to the salad. Cut the basil in a chiffonade and sprinkle over the salad along with some crumbled feta cheese. Just before serving, dice a pitted avocado and add to the salad. Pour the dressing over your salad and gently toss to coat.

7.23.2006

Sugar High Friday: Caramel Macchiato Ice Cream


Saturday's sundaes: Sara's on the left, mine on the right. I hate maraschino cherries.

A funny thing happened on the way to the ice cream maker: I used my crockpot for the first time ever.

Turn back to: Sara came over this weekend and willingly agreed to be my guinea pig taste-tester for this ice cream idea that's been bouncing around my head since the last time I pulled the Krups out earlier this month. I'd been wanting to do something with the half-bag of cappuccino chips remaining from the scones, and somehow I decided they needed to be put in ice cream.
From there: I think the name stuck in my head first. A caramel macchiato (you may recognize it if you've been to a Starbucks) is a delicious thing if you like some espresso with your sugar and cream. Macchiato apparently is some variant of Italian, meaning to mark, and traditionally means either an espresso with milk foam, or steamed milk marked by espresso poured over it. And here (or at least, I attempted to do that) the caramel is swirled through, effectively, if you will forgive the creative license, marking the ice cream. I didn't know this before i searched to see if the term was trademarked, I've always just rather liked the way the word rolls around one's tongue.
And so it follows: you simply cannot make a caramel macchiato without caramel. And then: possibly because of all the dulce de leche that has won itself a scoop of the ice cream world (I am looking at you, haagen-dasz), I thought more of a thick caramel than simply a caramel sauce. And that brought me back to: high school spanish classes, where we got a taste of culture in the form of a dulce de leche made by simmering a can of condensed milk.
So cooking caramel sauce in a can sounded great, until: I looked around and found several warnings about how actually it's not recommended as the can might explode and send caramel through three rooms of your house (call me paranoid, but I bet I'd find a way). So I looked around and found an alternative: heating the condensed milk in a double boiler for an hour and a half, stirring every five minutes, but that simply was
not going to happen.
And then:
in one single comment in a thread, someone noted that you could put it in a slow cooker.
Which, finally, brings us to the crockpot, and the point, if there is one, of this convoluted tale. It turns out to be that simple, which I never thought I'd use in conjunction with the word caramel. Open your condensed milk, pour it in a crockpot, set it on low, and leave it alone for six or so hours. (I had mine on low for six, and then I got tired and wanted to sleep so I turned it on high for twenty minutes to finish it off and that worked fine for me.) I would like to take the time to note that this is a brilliant idea if you have a removable insert for your slow cooker. It will still work if yours like mine is ancient enough to not be removed, but it's kind of obnoxious to clean. Nonetheless, this is surprisingly good, even excellent, lazy caramel if you're looking for a thickish rather than thin sauce.


CARAMEL MACCHIATO ICE CREAM

for the caramel sauce
2 14-oz cans sweetened condensed milk
for the ice cream
1 c whole milk
2 eggs
3/4 c sugar
2 c cream
2 tsp vanilla
1 c cappuccino chips
~ 1 c caramel sauce

To make the caramel: pour the two cans of condensed milk into a slow cooker/crockpot. Cover and set on low for six to seven hours. You may wish to stir occasionally but there doesn't even seem to be much of a need for it. When the caramel is cooked to a consistency and color of your liking, remove to a bowl to cool. Refrigerate until needed.
For the ice cream: heat the milk in a saucepan over medium low heat until warmed through but not yet at a simmer. In a bowl, whisk together the eggs and sugar until well blended. Pour in a bit of the milk, whisking as you do so, to temper the mixture. Add the remainder of the milk and whisk well; pour the milk mixture back into the saucepan. Cook the base mixture until thickened into a pale custard, not letting it boil, about ten minutes or so. Strain into a bowl or large measuring cup. When the custard has cooled, whisk in the cream and the vanilla. Cover and refrigerate for about 24 hours.
Pour the ice cream base into an ice cream maker and freeze it according to your directions. About two minutes or so before the ice cream is finished churning, add the cappuccino chips.
Have ready a container suitable for storing the ice cream in your freezer. Add about half of the ice cream from the maker (if your container is deep rather than wide, simply go in more layers) and spoon over it the caramel sauce. Add the remaining ice cream. Using a knife in wide strokes, swirl the caramel through the ice cream in long ribbons - you do not want the caramel to be fully mixed into the ice cream. Store remaining caramel in the refrigerator, it can be brought to room temperature or reheated in the microwave to serve with your ice cream as you wish.

7.20.2006

Justification Tastes Like Cherries

Confession: I made this recipe really entirely because I bought a cherry pitter (and I bought the cherry pitter originally just to make an almondized version of Ivonne's cherry coffeecake - use almonds in the topping, replace the yogurt with sour cream, and add 1 tsp. almond extract to the batter - it's supergood), and I felt the need to justify the purchase beyond that. I collect new cooking toys, although I've been very good in limiting myself for the most part over the past year, as in the past I've gotten some and just never done very much with them. Some are infrequently used but indispensable when you want them, like this gorgeous food mill or a food processor, and those are perfectly acceptable. Some, like the bamboo steamer which I think is in a closet somewhere, ditto my creme brulee torch, were things I didn't think through well enough and now sit there waiting for nothing. But I wanted the cherry pitter to be different and not just a one-hit wonder purchase. It's quite a fancy little gadget, advertising a suction base and rapid-fire action, and sounded so cool that though it was a few bucks more, it simply had to be done. As Sara pointed out to me, at least I didn't spring for the really hardcore version.
The combination may go against your judgment at first, but think about all the yummy meat and fruit things that do go together - pork with pears or apples, chicken and apple sausage, turkey and cranberry sauce, duck with orange. I'm calling it gravy because of the roux to thicken it a bit, but should you want more of a pan juices sauce simply leave it out. The wine flavor seems more pronounced the next day. As it does have a sweet tinge, you'll want a good savory foil to go along. I made mine with a saffron pilaf, lightened a bit by the addition of lemon juice, but mashed potatoes a la Thanksgiving would be my next choice.
As for the cherry pitter? Worth every penny.

PORK LOIN WITH CHERRY GRAVY
adapted from the all-new Joy of Cooking

for the pork
~ 1 lb pork loin
dried marjoram, sage, and savory
olive oil
salt and pepper
for the sauce
1/2 onion, chopped fine
1 Tbsp flour
1 c red wine
1/2 c milk
1 1/2 c cherries, stemmed and pitted
1 tsp balsamic vinegar
1/2 tsp dried thyme leaves
1 tsp lemon juice
1 1/2 Tbsp brown sugar

Preheat the oven to 450 F. Take the pork loin and rub well on all sides with olive oil. Sprinkle over a mixture of the herbs and salt and pepper, and rub well over the surface of the pork. Place in a saute pan or Dutch oven and place in the oven. Cook at 450 for ten minutes, turning the pork after five. Turn the heat down to 250 and cook for another ten to fifteen minutes, turning every five minutes or so.
Meanwhile, halve the cherries and place in a bowl. Sprinkle over the balsamic and thyme and let sit while the pork cooks. When the pork is done, remove to a plate and cover with foil.
Take the pan in which the pork cooked and place on the stove above medium heat (if your pork was well trimmed, you may need to add a bit of oil to the drippings). Saute the onion in the drippings for a few minutes until beginning to soften. Sprinkle the flour over and stir in well. Let the flour mixture cook for a few minutes until beginning to color light brown. Stirring carefully as you go, add the wine to the pot. Bring to a gentle boil and stir for a minute or two. Add the milk and stir well. Add the cherry mixture, scraping the bowl to get the juices and vinegar, the lemon juice, and the brown sugar to the pot and stir well. Let boil for about three minutes, stirring well.
By this time the pork should have rested enough to be ready to cut. Slice the pork and pour some hot cherry gravy over each portion.

7.19.2006

Lunchbox: Watermelon Salad

Even though it’s mid-July, I had my first summer watermelon just this past weekend. It was excellent, and that one taste has brought a sudden craving on for more. I was reminded of a page from Forever Summer with a recipe for watermelon and black olive salad which at the time I walked right on by. I’m not one for olives, but right now I’m all for watermelon and salad.
Turns out it's not as original an idea as I thought - the Epicurious search brought up 15, and all with helpful comments on variations. I kept reading and thinking of bits and pieces I wanted to borrow from each one. In the end, I don't think it's so much exactly watermelon salad as it is salad, with watermelon in it, but enh - semantics.
I won't lie to you, this is a last-minute salad and requires that you carry several containers, which is points off in the lunchbox category. But it's worth the minor effort - I made the mistake the first day of trying to assemble it ahead of time, and while it was edible it was indistinguishable - and it pulls together quickly when you're ready for it.

WATERMELON SALAD

for each salad portion:
1 large handful baby spinach mixed with mesclun greens
1/4 small vidalia onion
5 small basil leaves
1-2 oz fresh mozzarella
pecorino romano
1 small vine-ripened tomato
1 small ripe peach
3 to 4 3/4-inch-thick wedges sweet seedless watermelon

balsamic vinegar
olive oil
salt and black pepper

Take one large container for the salad and put in the mixed greens. Slice the onion very thinly and scatter over the greens. Cut the basil leaves in a chiffonade, slice the mozzarella, and add both to the bowl. Crack black pepper and grate pecorino romano over the greens. Put this in the fridge until ready to eat.
In a separate container, put the watermelon, cut into about 1-inch chunks. Refrigerate. Make yourself a small dressing in another container using the balsamic, olive oil, and salt and pepper to taste (I won't give you quantities because I didn't measure, and this is a matter of preference. I happen to be a vinegar addict and so mine's lopsided that way). Refrigerate.
For lunch take your three containers of salad, watermelon, and dressing, plus the peach and tomato. When you're ready to eat, wash and dice the tomato and peach. Toss the salad gently to get that distributed a bit. Add the watermelon, leaving behind any drained juice. Whisk the dressing again and pour over. Toss to combine all and you're good to go.

7.12.2006

Lunchbox: Pork Loin Braised in Milk

I like shopping. I love grocery shopping. I love sales. And I am an impulse buyer.
Which goes quite a ways in explaining why, until recently, I had seven pounds of pork loin in my freezer.
You might think that the fact that a singleton can only eat so much in one sitting, and indeed can only face so much monotony over the course of a week's dinners or lunches before she craves something else, would come to mind. Or you might think that it would occur to me that my freezer really is not all that large, and that it's not really empty to begin with and my pantry's certainly stocked as well, or perhaps that a voice of reason would pop up reminding me that I didn't have any meal ideas that required pork loin for that week, or that I didn't even have any planned for the relatively immediate future.
But here you would be wrong.
And so some weeks on faced with a freezer of pork and nowhere to even place a tray of ice cubes, the pork is designated meals until I've got enough room to put the ice cream bowl back in. This recipe is so stupidly easy I'm not sure why it hasn't occurred to me to try before, aside from the fact that it does require a few hours' time. But the attention is minimal, preparation is practically zilch, and the pork that comes out of the pot at the end is tender and juicy. The meat unravels along the grain easily, peeling into thin skeins and cords. I tossed it together with some tomato sauce and whole wheat pasta, but thickish warm slices with pan juices would be excellent as well, either for a first night's dinner or the next day's sandwich.

PORK LOIN BRAISED IN MILK
adapted from Essentials of Classic Italian Cooking

1 Tbsp butter
2 Tbsp vegetable oil
2 lbs fairly well-trimmed pork loin
2 thick slices bacon
salt and black pepper
2 1/2 or so c whole milk

Choose a pot that will snugly hold the meat (I started out in a Dutch oven, but switched down to a largeish saucepan), put in the butter and the oil, and turn the heat to medium high. Sprinkle a tiny bit of salt and a judicious amount of cracked black pepper over the pork loin. When the butter foam subsides, put in the meat with the fattier side facing down at first. As it browns turn it every few moments until the meat is browned on all sides - if the butter starts becoming too dark, adjust the heat downward. Position the pork in the center of the pot. Cut the bacon slices in halves and arrange over the top of the pork loin.
Add 1 cup of milk slowly. Allow the milk to simmer for 20 to 30 seconds and then turn the heat down to a minimum. Cover the pot with the lid slightly ajar.
Cook at a very lazy simmer for just about one hour, turning the meat from time to time and moving the bacon slices to the top to cover as you go, until the milk has thickend through evaporation into a nut brown colored sauce or clumps, if you've had it too high like mine did. When you've reached this stage add 1 more cup of milk, let it simmer for about 10 minutes, and then cover the pot tightly. Check and turn the pork from time to time.
After 30 minutes of this set the lid slightly ajar. Continue to cook at minimum heat and when you see no liquid milk (it will be clumps, though you will see liquid fat) in the pot add another 1/2 c of milk. Continue cooking until the meat feels tender when prodded with a fork and all the milk has coagulated into the light brown clumps. The whole process will take about 2 1/2 - 3 hours. If before the meat is fully cooked the liquid in the pot has evaporated, add another 1/2 c of milk and continue cooking as directed.
For pan sauce: spoon off most of the fat but leave behind the coagulated milk clusters. Add 2 to 3 Tbsp water and boil away the water at high heat while using a wooden spoon to scrape the bottom and sides of the pan. Serve over slices of pork.

7.11.2006

The Last of the Mussels (but not Martha)

this basil garnish is brought to you by Rob.

At this point, I may actually have a touch of mussel fatigue. It's been a lovely trip of discovery, with tomato-touched and cream-sauced, and in the box's final hurrah, I like to think of this as buttery-winey-mustardy goodness.
What I learned about frozen seafood recipes in the process is actually extremely valuable - that these types of meals are easy enough for a weeknight, in that frozen seafood tends to cook or reheat itself rather quickly, and certainly they take far fewer time than I might have expected. Kind of strange - I suppose I always must have equated seafood with fancy, which I then word-associate with time-consuming, or special occasion. I think it's always nice to get that sort of reminder, the type of one that Rachael Ray is building an empire upon, in smacking oneself over the head that really good food doesn't have to be restricted, that it doesn't require eons or even extensive planning, that impressive dishes can and often are secretly, surprisingly, not all that difficult and can be simply made even by mere mortals such as myself.
So I suppose actually it's rather apt that I took this from a Martha Stewart cookbook. I'm torn on Martha, in a sense, in that she does seem so eerily perfect (and here we are going strictly in the domestic realm). There was a girl I went to high school with who was a junior Martha in spades: beautiful, brainy, athletic, and with a mother as a caterer was quite the cook herself. And Martha was an idol to her, an inspiration. I remember going to the end-of-the-year senior English class party and seeing her towering display of blueberry muffins, complete with basket, teatowel, ribbons and loose but artistically arranged berries, which at once both made me jealous and horrified me. That I thought she was also making an all-out run for my then-boyfriend, I am sure, had nothing to do with that. Hell hath no fury like a teenager scorned for someone else's cookies. She seemed so destined for Stepford wifedom, and myself not so much, that I thought surely I couldn't compete with that, and best not to try.
Certainly then it was with some trepidation that I turned to The Martha Stewart Cookbook to find new baking recipes for this coming weekend, but I figured it was time to bury the fear and the hatchet. If you want to impress, you go with the best, and grudgingly I admitted that Martha Stewart comes to mind as one of those experts on well, pretty much anything (Nigella, I think, will still be first in my heart). Oddly enough, I didn't find any breakfasty things I really wanted to try, but I came across numerous non-intimidating recipes for other items. And that was a true discovery. The mussels may be gone, but it looks like the Martha recipes are just beginning.

WARM MUSSEL SAUCE WITH PASTA
adapted from The Martha Stewart Cookbook

1/2 medium sweet onion, chopped
2 Tbsp unsalted butter
1/2 bottle white wine (following Martha's recommendation, it was a Sauvignon Blanc)
20 frozen New Zealand mussels on the half shell
8 oz pasta of your choice (the one above is a spinach and chive linguine from TJ's)
sauce
2 Tbsp Dijon mustard
3 Tbsp white wine
3-4 Tbsp lemon juice
1/2 c olive oil
1/4 c whole milk
parsley
salt and pepper to taste

Have the water for the pasta boiling by the time you start - if you use a thinner pasta or a fresh one, you should be able to it ready just in time to mix everything together.
In a saucepan, melt the butter over medium heat and saute the onion until tender but not browned, about 5 minutes. Add the wine and bring to a boil. When the liquid is at a boil, add the mussels and cover. Start the pasta cooking now. Give both five minutes, at which point the mussels should be heated through and the pasta al dente.
In the meantime, make the sauce: in a bowl large enough to toss the pasta and sauce together, put in the mustard, wine, and lemon juice. Whisk together until the mustard loosens. In a measuring cup measure together the milk and oil and, whisking as you go, pour into the mustard mixture in a steady and slow stream. Add parsley and salt and pepper to taste and whisk well.
When the five minutes are up, shut the mussels off and leave covered momentarily. Drain the pasta well and add it to the sauce, tossing gently to coat. Take the mussels and drain them over a large measuring cup or bowl so that the liquid is reserved. Add whatecer of the reserved cooking liquid to the hot pasta and sauce to your taste - the sauce will be thinned, but it should still coat the pasta well. Serve pasta and sauce into two bowls. Divide the mussels and onions between the two bowls and serve.
Yield: two generous servings mussels, with some leftover pasta and sauce.

7.06.2006

This Post Is For Sara

Sara was so thrilled upon seeing the words New Zealand on this blog, that I simply had to dedicate this one to her. Sara, lucky girl, has actually been to NZ, lived there, gone to school there, and enjoyed the country live and in person. I've never been, though I've seen all three Lord of the Rings movies, which probably does not count for much of anything except give me a vague idea of the country's beautiful scenery. Right now I'm enjoying New Zealand from afar and their green-lip mussel exportation above anything else, and consequently am earmarking any mussel recipe I can find. This caught my eye as I've got a lovely little basil plant from the farmer's market that has somehow survived my plant ineptitude and I can't resist its siren song to be used. The truffle butter was thrown in on the realization that the only other butter was in the freezer, and I haven't touched it in a while. The boss brought it back as a souvenir of Paris (again, I've never been) and it is so rich, so tasty, so utterly expensive sounding that I can only bring myself to use it sparingly. You needn't go to that extent, but darn, it's a splendid addition.
The cream sauce makes enough for two generous pasta servings, I think, so you could simply double the mussels and have dinner for two. If you're not into that, simply split the pasta in portions as you please. Eat one with the mussels fresh and hot and refrigerate the rest. If you reheat the pasta in a saucepot with a dash more liquid (cream, milk, wine, broth, whatever) and toss in a half can or so diced tomatoes and juices, it makes a good quick-and-dirty blush cream sauce - actually, I'd probably make it again just like that.

MUSSELS WITH BASIL CREAM SAUCE
adapted from Gourmet, June 2004

1/2 medium onion, chopped
4 small garlic cloves, pressed
1 tsp truffle butter
1 Tbsp margarine
1/3 c plus 1 Tbsp white wine
1/2 c heavy cream
15 to 20 small to medium size fresh basil leaves, shredded or cut chiffonade
8 frozen New Zealand mussels on the half-shell
3/4 c or so frozen peas
grated Parmesan
salt and black pepper to taste
hot cooked angel hair pasta

In a saucepan, melt together the truffle butter and margarine over medium heat. Add the onion and garlic and stir; cook until softened, about 5 minutes. Add 1/3 c white wine and the 1/2 c heavy cream to the saucepan and bring to a gentle boil. Add the mussels, stir, and cover. Let cook about 4-5 minutes or until mussels are warmed through.
Meanwhile, place the peas in a small bowl, add the 1 Tbsp wine, and microwave about 3 minutes until cooked through. Have the pasta ready in a large bowl.
When the mussels are done, remove them with a slotted spoon to another bowl. Pour the cream sauce over the hot pasta and add the peas. Add the chiffonade of basil leaves, a large pinch or two of Parmesan and a generous amount of cracked black pepper. Toss gently to combine and correct taste with salt and pepper if need be.
Reserve half the pasta for leftovers in a separate bowl. Take the other half and add the mussels, stirring gently to coat with sauce. Serve hot, garnished with basil.
Yield: one serving mussels, two servings pasta.

7.05.2006

Out and About: Liki

I don't remember the first time I ever ate sushi, or even the time thereafter, but somewhere along the way I realized: it's excellent. And I like to remind myself every chance I get. For our second date, I took Rob for sushi, and thankfully he's an adventurous eater (it seems I eat just about anything) and sportingly has taken quite well to it. I am sure I could love a man even if he didn't love sushi, but to be quite honest, I'm glad I don't have to find out for certain. Since that time, we've found two by me we keep in a rotation, but I think we've added another.
Over the weekend we found ourselves for the second time at Liki, which we discovered when looking through apartments, as it's dangerously close to his new one. We were highly ambitious and hungry after a weekend of moving, and pushed ourselves to the limit with a split order of seven (!) rolls.
left: orange roll: smoked salmon and eel, topped with mango slices and seaweed salad.
center: lemonade rolls: shrimp with cucumber and avocado, topped with yellowtail, slices of lemon and masago.
right: green river roll: crab topped with kiwi slices and mango sauce.
left: mexican roll: shrimp tempura with cream cheese, topped with avocado.
center: pearl roll: spicy tuna with asparagus, topped with tobiko (the green is wasabi tobiko, and you can taste it.)
right: oyster roll: deep fried oyster, topped with avocado.

Spider rolls, or soft-shell crab tempura, is sort of a tradition - we order one every time, and save the largest pieces with the legs for last. I can never eat the whole piece in one bite, despite valiant efforts, but I didn't make too large a mess - I've improved greatly with chopsticks over a long while. And though it turned out to be more food than we needed certainly, Liki's rolls were so good, so fresh, that we ended up members of the clean plate club in the end. Oh yes, we will return.